Channeling ruins more shots than grind size mistakes, yet most home baristas skip proper puck preparation entirely. A $30 WDT tool and two extra minutes of technique will prevent the fast channels that cause sour, underextracted espresso — no matter how expensive your grinder is.
Why Puck Preparation Determines Extraction Consistency
Espresso extraction depends on uniform resistance across the coffee bed. When clumps exist or density varies, water takes the path of least resistance through faster channels. These channels extract quickly and turn sour while denser areas remain underextracted.
Research from the Specialty Coffee Association demonstrates that uniform particle distribution reduces extraction variance by 15-20%. Even high-end grinders like the Niche Zero or DF64 produce some clumping — static electricity causes fine particles to aggregate during grinding, creating density variations before the puck even enters your portafilter.
Your Best Coffee Grinders Espresso matter, but post-grind preparation determines whether those precise particle sizes extract evenly. The goal isn't just a level surface — you need consistent density throughout the entire puck depth. That requires breaking up clumps and redistributing fines before tamping locks everything in place.
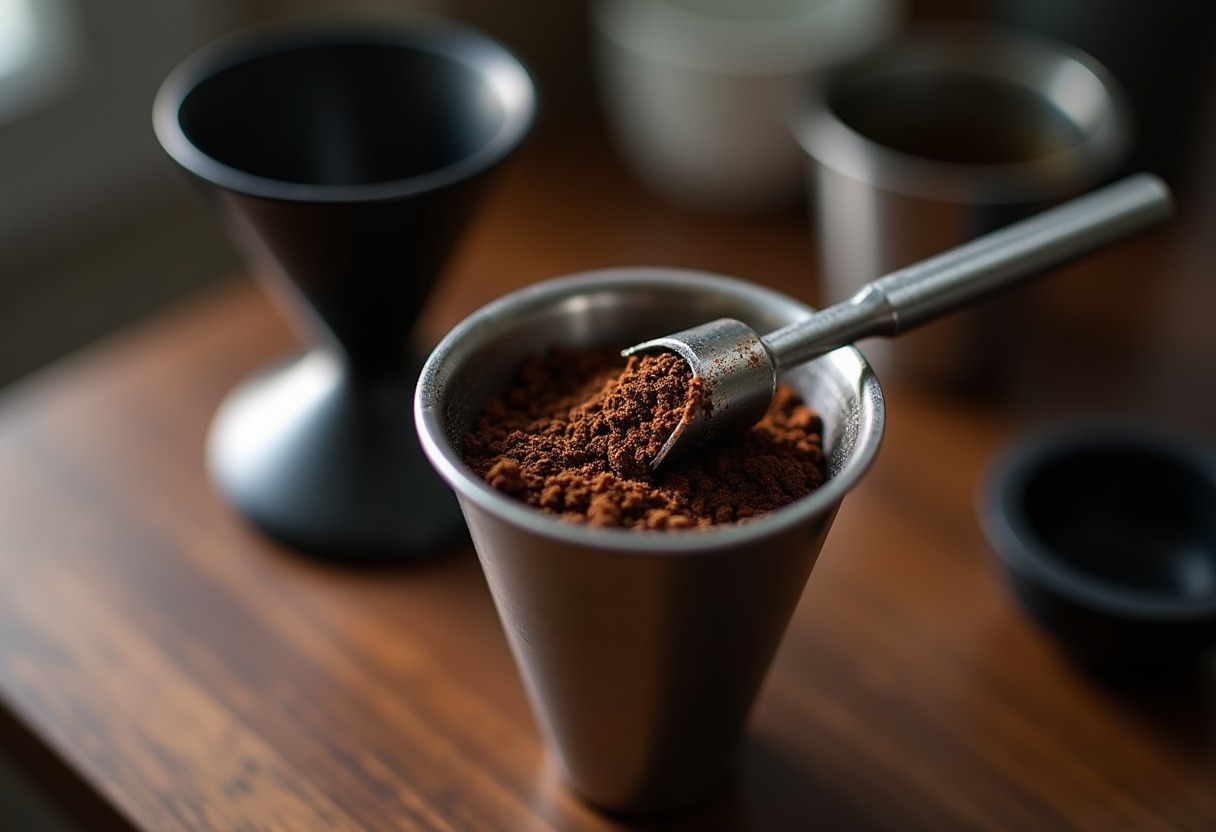
WDT Tools: What Actually Works
Weiss Distribution Technique (WDT) uses thin needles to break up clumps and redistribute coffee grounds before tamping. The technique works because needles thin enough (0.3-0.4mm) separate clumps without compacting grounds prematurely.
Effective WDT tools need:
- Needle diameter: 0.3-0.4mm achieves clump breakup without compaction. Thicker needles (0.6mm+) push grounds rather than separating them
- Needle count: 6-8 needles provide adequate coverage for 58mm baskets without overcrowding
- Needle depth: Needles should reach within 2-3mm of basket bottom to break up all clump layers
- Handle ergonomics: You'll use this tool 4-6 times per shot, comfort matters
The → Shop WDT espresso tool on Amazon offers both 3D-printed and machined options. Avoid acupuncture needles despite their popularity — they're too flexible and inconsistent in diameter.
WDT technique sequence:
- Grind directly into dosing funnel on portafilter
- Insert needles to full basket depth
- Stir in concentric circles, working from outside to center
- Make 10-12 complete rotations with varying depths
- Finish with two passes across the top to level surface
Skip the temptation to spiral infinitely. After 12 rotations, you're redistributing already-distributed grounds. More motion introduces compaction and can create new density problems.
Dosing Funnels vs Distribution Tools
Two approaches exist for managing grounds before WDT: dosing funnels and palm distribution tools. They serve different purposes in your workflow.
| Tool Type | Function | Prevents | Works With | Cost Range | |-----------|----------|----------|------------|------------| | Dosing Funnel | Contains grounds during grinding, enables overflow dosing | Mess, grounds on counter, rim contamination | All grinders, especially single-dose | $15-45 | | Distribution Tool | Levels and slightly redistributes grounds using spinning grooves | Surface unevenness, minor clumping | Step grinders with good initial distribution | $25-60 | | WDT Tool | Breaks clumps at all depths, redistributes fines throughout puck | Channeling, density variation, clumping | All grinders, essential for popcorn-prone grinders | $20-50 | | Puck Screen | Creates boundary layer, may improve top-puck flow | Top-surface channeling, puck erosion | Post-WDT, requires precise dosing | $15-30 |
Dosing funnels matter most for single-dose grinding workflows. The → Shop dosing funnel 58mm on Amazon prevents the cascade of grounds that inevitably occurs when your Single Dose Espresso Grinder Workflow produces slightly more than basket capacity. Magnetic funnels attach directly to portafilter edges — the connection eliminates gaps where fines escape.
Distribution tools (also called spinners or levelers) work by spinning a grooved base across grounds surface. They level effectively but only penetrate the top 3-4mm of the puck. If your grinder produces minimal clumping — think Kafatek Monolith or Weber EG-1 — these tools suffice for surface prep. The → Shop espresso distribution tool on Amazon includes depth-adjustable options.
For grinders below $1,000, especially those with higher retention rates covered in Espresso Grind Retention, WDT remains non-negotiable. Conical burr grinders produce more clumping than flat burrs due to particle shape distribution — see Conical Vs Flat Burr Grinders for the mechanism.
Complete Puck Prep Workflow
The sequence matters as much as the tools. Each step builds on the previous one.
Step 1: Grind into funnel — Dose 0.5-1g over target. Overflow gives you material to work with during distribution without creating voids. Purge 2-3g before your shot dose to clear retained grounds.
Step 2: WDT immediately — Static charge dissipates within 30-60 seconds. Perform WDT while grounds retain charge, which helps break clumps as particles repel each other. Wait too long and humidity begins to affect grounds.
Step 3: Remove funnel, tap portafilter — Two firm taps on the counter settle grounds and eliminate any voids created during WDT. Don't tap after tamping — it creates microfractures in the puck surface.
Step 4: Optional distribution tool pass — If you're using both WDT and a spinner, the spinner provides final leveling only. Set depth so the base barely contacts the grounds surface. One clockwise rotation suffices.
Step 5: Tamp with Best Espresso Tampers — 30 pounds of pressure (about 15kg) compresses grounds to proper density. The exact pressure matters less than consistency between shots. A calibrated tamper removes guesswork.
Step 6: Polish — One light spin of the tamper while maintaining downward pressure seals the surface. This step prevents the initial water contact from eroding loose particles.
Step 7: Optional puck screen — Place → Shop puck screen espresso on Amazon on top of tamped puck. Screens create a metal boundary that promotes even water distribution during the first seconds of Espresso Pre Infusion Timing Pressure Curves. They also protect group head screens from coffee oils.
Total time: 90-120 seconds from grind to first drop. Rushing any step reintroduces the channeling you're trying to prevent.
Advanced Techniques Most Posts Skip
Strategic basket selection — VST and IMS precision baskets feature laser-cut holes with tight tolerances (±0.1mm). Standard baskets vary by ±0.3mm, creating uneven flow patterns even with perfect puck prep. The basket is the mold — inconsistent holes mean inconsistent extraction regardless of distribution technique.
RDT before grinding — Ross Droplet Technique adds 1-2 drops of water to beans before grinding. Water eliminates static electricity, preventing clump formation during grinding. Your WDT tool still breaks up mechanical clumping from burr shear, but grounds flow freely without electrostatic aggregation. Use 0.5-0.7ml per 18g dose — a spray bottle with one pump provides the right amount.
Depth-variable WDT — Most people WDT at one depth. Instead, make three passes: first at full depth (breaking deep clumps), second at mid-depth (redistributing between layers), third at surface level (final leveling). Each pass uses 3-4 rotations. This technique mirrors the way water flows through different puck layers during extraction.
Pressure feedback during tamping — Consistent tamp pressure produces consistent flow resistance, which affects Espresso Extraction Yield Target Range. A bathroom scale provides feedback: place your portafilter on the scale, press the tamper until the scale reads 30lbs (13.6kg), note the compression depth. After 10-15 practice reps, your proprioception calibrates and you'll hit that pressure without the scale.
Temperature stabilization timing — The metal portafilter acts as a heat sink. If you prep your puck then wait 3+ minutes before locking in, the portafilter cools below optimal extraction temperature. Your Espresso Brew Temperature Guide assumes the portafilter starts near brewing temp. Complete your puck prep, lock in immediately, then pause to let your machine's Espresso Machine Pid Controller recover thermal stability if needed.
Funnel-based dosing for consistency — The dosing funnel isn't just for cleanliness. It enables a technique where you dose 20-21g for an 18g basket, WDT thoroughly, then use a straight edge to scrape excess grounds off the funnel top. This ensures your basket receives exactly 18.0g after distribution, eliminating the dose variance that occurs when you try to hit exact weight before distribution.
Essential Tools and Recommendations
WDT Tools: Self-built options using 0.4mm needles and 3D-printed handles cost $15-20 in materials. Manufactured tools like AutoComb or Saint Anthony Industries offer better ergonomics for $40-50. Avoid anything marketed as "espresso rake" — they're too aggressive.
Dosing Funnels: Magnetic aluminum funnels from Sworksdesign or Duomo fit 58mm portafilters precisely. The → Shop coffee leveler on Amazon includes combination funnel-leveler units, though dedicated funnels perform better. Budget option: 3D-printed funnels from Etsy ($12-15) work fine if the fit is tight.
Distribution Tools: OCD (Ona Coffee Distributor) remains the reference standard with depth adjustment in 0.1mm increments. Cheaper versions from Normcore and Matow perform identically for home use — the mechanism is simple. Spinning consistency matters more than brand.
Puck Screens: Stainless steel mesh screens in 58mm work across all basket depths. IMS and VST both make precision versions. Standard mesh screens from generic suppliers cost $8-12 and perform the same function. Replace every 3-4 months as coffee oils accumulate in the mesh.
Tamper Considerations: Your tamper base diameter must match your basket — 58mm baskets need 58.3-58.5mm tampers for proper seal. Convex bases create slight edge gaps that some claim improve flow, but testing shows minimal difference. Flat bases work. Calibrated tampers with clicking mechanisms eliminate pressure guesswork.
Frequently Asked Questions
Does WDT actually matter if I have a high-end grinder? Yes. Even flat burr grinders above $2,000 produce some clumping due to particle friction during grinding. Static electricity affects all grinders regardless of price. The quality difference is that expensive grinders produce more uniform particle sizes, which WDT then distributes evenly rather than fighting against inconsistent grinding.
How do I know if I'm WDT-ing too aggressively? If your grounds appear compressed or develop visible grooves after WDT, you're pressing too hard or using needles above 0.5mm diameter. Proper WDT feels like stirring loose grounds, not sculpting dense material. Your basket should look fluffy, not packed, after WDT and before tamping.
Can I skip the dosing funnel if I'm careful? Careful dosing still leaves rim contamination that prevents proper portafilter seal in your Espresso Group Head Types. Even 3-4 grounds on the basket rim create channels where water bypasses the puck edge. Funnels also enable the overflow dosing technique that improves shot-to-shot consistency when How To Dial In Espresso.
Do puck screens improve extraction or just reduce mess? Both. Puck screens create a boundary layer that encourages lateral water spread during pre-infusion, improving top-puck saturation. They also prevent the shower screen erosion that occurs with soft pucks. The effect is measurable but small — expect 1-2% extraction yield improvement, not transformation.
What's the minimum viable puck prep setup? WDT tool and tamper. You can skip the dosing funnel if you're extremely careful, skip the distribution tool entirely (WDT replaces it), and skip puck screens for months. But skipping WDT means accepting channeling, and skipping a proper tamper means inconsistent pressure. Those two tools are non-negotiable for espresso that approaches your Best Espresso Machines Home 2026 potential.
The Real Win
Proper espresso puck preparation removes the biggest variable between your grinder's capability and your cup quality — every other technique adjustment assumes uniform extraction as the baseline.
Some links on this page are affiliate links. We may earn a small commission if you purchase through them, at no extra cost to you.
As an Amazon Associate we earn from qualifying purchases. This article contains affiliate links; if you buy through them we may earn a small commission at no additional cost to you.